
If you ever wondered, if it is possible to retrofit headlamp washers to Zafira B and what new parts are needed and which ones need replacing, here is a short guide accompanied with several pictures documenting the whole process. Fitting the washers to the standard halogen headlights is probably not worth the effort, but if you are considering upgrading to AFL Bi-Xenon headlamps, headlamp washers are a must.
Prerequisites
The first thing you should check whether your UEC supports headlamp washers. In UEC under variant configuration you should see the following options available and set it to Present Zafira B. Either with TECH2, GM MDI, or OPCOM (China clone should work as well).

Electrical schematics
The headlamp washers are operated by a separate pump, which is controlled from UEC via delay relay K7_X125 and protected via FE9 25A fuse. There is one wire (2.5mm2 black-red) going from UEC XE1 connector pin 46 to ZFW 2-58 conector pin 1, which connects to the pump. Pin 2 on ZFW 2-58 connects to GND via 2.5mm2 brown wire (which is then aggregated with other ground wires to 6mm2 brown wire and terminated to the grounding point 4 in engine compartment).

Schematics of the headlamp washers pump.

ZFW 2-58 connector with pins.

XE1 connector within UEC (X125).
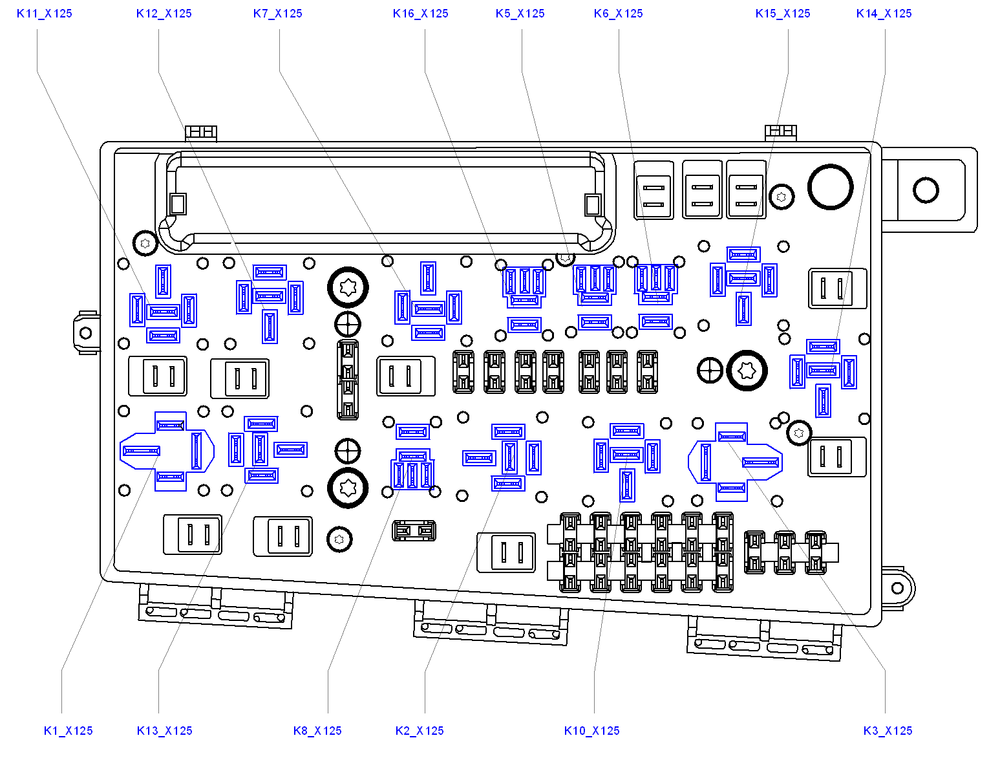
Headlamp wash pump relay K7_X125.

Headlamp wash pump fuse FE9 (25A).

Engine compartment left – grounding point 4.
Shopping
The headlamp washers consist of the extracting pressure valves [2] (referenced as motors), on top of which nozzles [1] are attached (that spray the washing liquid onto the headlamp). The motors are held in place by retainers [10], which are attached by an adhesive tape to the bumper, and the motors with nozzles are covered on top with plastic covers [9] (which are primed and require a paint job according to the actual color of your car) to hide the washers once retracted into the bumper. The motors are connected to 8mm2 rubber hose [3], which is connected via quick coupler to the second hose [8] and then fed from headlamp wash pump [5]. The pump needs separate attachment to the reservoir with washing fluid [4], therefore you need to replace it with a appropriate one (also the reservoir for headlamp wash is approx. 4L in capacity, while the one without headlamp wash has capacity of 2L). The attachment of the pump is done with a retaining ring [6] and is water-sealed with a rubber gasket [7].

The only unique parts regarding pre-facelift (2005-2008) and facelift (2008-2014) models are the covers [9] and retainers [10]. They are listed separately in the table so shop accordingly to your model of Zafira. I have included retail prices in the table as a reference. You can usually get the parts with a 10-30% discount once quoted from your Opel/Vauxhall dealer. Or you can shop on eBay or other sites with used car parts, or visit a scarp yard and get most of the parts dirty cheap.
List of parts needed for retrofit
| # | Part number | GM number | Description | Retail price |
|---|---|---|---|---|
| N/A | 13171756 | 12 38 381 | FUSE,25 AMP (NATURAL) | 3,42€ |
| N/A | 13171831 | 62 38 640 | RELAY,MULTI-USE,BLACK (DELAY RELAY) | 48,66€ |
| 1 | 13145531 | 14 52 883 | NOZZLE, HEADLAMP WASH, LH | 79,08€ |
| 1 | 13145532 | 14 52 884 | NOZZLE, HEADLAMP WASH, RH | 79,08€ |
| 2 | 13145534 | 14 52 109 | MOTOR, HEADLAMP WASHER, LH | 66,60€ |
| 2 | 13145535 | 14 52 110 | MOTOR, HEADLAMP WASHER, RH | 66,60€ |
| 3 | 13145536 | 14 51 029 | HOSE, 8MM ID. X 1695MM, HEADLAMP WASHER, NOZZLE | 22,56€ |
| 4 | 13192025 | 64 50 506 | RESERVOIR, ASSY., WINDSCREEN, HEADLAMP AND TAIL GATE WASH, LESS COVER | 67,68€ |
| 5 | 90508709 | 14 52 104 | PUMP, RESERVOIR, HEADLAMP WASHER | 98,64€ |
| 6 | 93189308 | 14 50 612 | RING, RETAINING, PUMP, RESERVOIR, WINDSCREEN WASHER | 2,22€ |
| 7 | 90053056 | 14 52 200 | GASKET, PUMP TO RESERVOIR, HEADLAMP WASHER | 3,12€ |
| 8 | 93178658 | 64 50 505 | KIT, REPAIR, HOSE, HEADLAMP WASHER | 96,48€ |
| Pre-Facelift Model 2005-2008 | ||||
| 9 | 13124964 | 14 52 881 | COVER, HEADLAMP WASHER NOZZLE HOLE, PRIMED, LH | 25,68€ |
| 9 | 13124965 | 14 52 882 | COVER, HEADLAMP WASHER NOZZLE HOLE, PRIMED, RH | 25,68€ |
| 10 | 13178250 | 14 52 895 | RETAINER, NOZZLE, HEADLAMP WASH, LH | 18,54€ |
| 10 | 13178251 | 14 52 894 | RETAINER, NOZZLE, HEADLAMP WASH, RH | 18,54€ |
| Facelift Model 2008-2014 | ||||
| 9 | 13247297 | 14 52 119 | COVER, HEADLAMP WASHER NOZZLE HOLE, PRIMED, LH | 26,82€ |
| 9 | 13247298 | 14 52 120 | COVER, HEADLAMP WASHER NOZZLE HOLE, PRIMED, RH | 26,82€ |
| 10 | 13263188 | 14 52 121 | RETAINER, NOZZLE, HEADLAMP WASH, LH | 19,32€ |
| 10 | 13263189 | 14 52 122 | RETAINER, NOZZLE, HEADLAMP WASH, RH | 19,32€ |
Below are the actual photos of all the parts I bought for my retrofit (I own a facelift Zafira). Most of the parts I bought are used but I strongly recommend you buy the retainers and covers new (as I did), as the adhesive tape on the retainers gets destroyed once they are removed from a bumper and it would be much more hustle to replace the tape. Also, the new covers are primed and ready to be paint, so you don’t have to waste time preparing/sanding/cleaning the used covers for painting (or you might get lucky and find some used covers in the exact color of your car).

Covers 13247297 & 13247298

Covers 13247297 & 13247298

Retainters 13263188 & 13263189

Retainters 13263188 & 13263189

Nozzles 13145531 & 13145532

Motors 13145534 & 13145535

8mm hose 13145536

Fuse 25A 13171756

Relay 13171831

Reservoir 13192025

Reservoir 13192025

Detail of reservoir 13192025

Pump 90508709

Gasket 90053056 & Retainig ring 93189308

Repair kit hose 93178658 (picture of the original hose, not the repair kit)
I did not include in the list part numbers for the front bumper, because there are many variations depending on facelift and OPC/VXR status and presence of parking sensors. Besides, the new bumper list price is over 770€ and you need to add the price of a paint job from a workshop. It makes much more sense (economically) to cut the holes into existing bumper as I will demonstrate further below.
Getting electrical wiring ready
Wiring for headlamp wash pump is part of the headlamp harness. Depending on your configuration, the wiring might be already present, even though you do not have headlamp washers installed. My harness (ident 7KP) had the ZFW 2-58 connector already installed from the factory and was secured with a tape to the other wiring under the left headlamp (blue circle in the next photos). Once you remove the front bumper, you should be able identify, whether yours is present. If not, you will have to get one from a donor vehicle or shop for a scraped headlamp harness which has the connector (if you are going to retrofit xenons, it’s the easiest way to get all the connectors needed). There is also a possibility to buy a repair harness with the connector from Opel/Vauxhall – CONNECTOR, PUMP (ZFW 2-58) part number 93187167 (GM number 62 86 750). But it costs 107,88€ so I am pretty sure you will get it cheaper when you buy second-hand headlamp harness. Then you can replace the whole harness or just snap/unpin the two wires with the connector and fit the black-red one into UEC XE1 connector into position 46 and brown one to the grounding point.
Once the wiring is in place, you need to insert black Hella relay into position K7_X125 (blue circle, in the UEC it is marked as K3 for some reason) and 25A fuse (“natural” color) into position FE9. It might be possible, that your UEC does not have the metal pins in place for the relay (the relay will slide easily into the slots without any resistance as opposed to other fitted relays). But this can be fixed by disassembling the UEC and fitting the missing pins as I had to undergo with my UEC ident LM (I will address this procedure in another separate post later).

ZFW 2-58 connector in the blue circle.

Detail of the ZFW 2-58 connector.
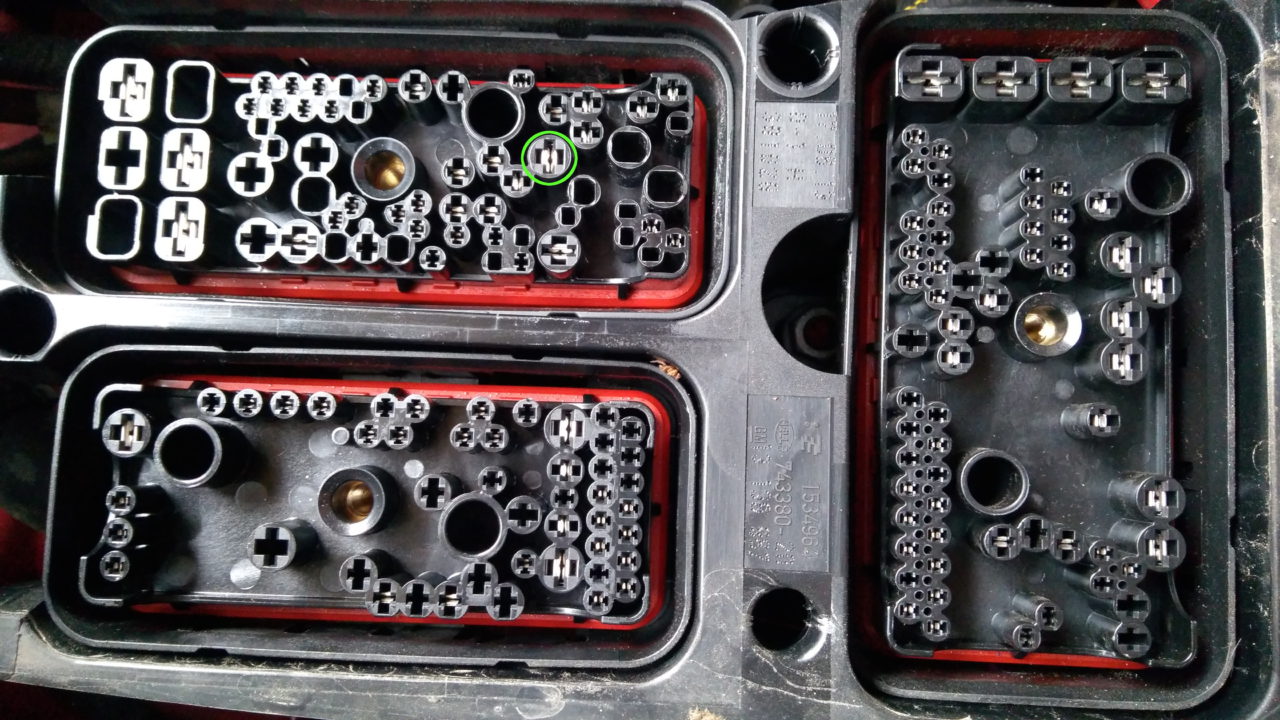
The green circle marks position 46.

Harness for retrofit.

ZFW 2-58 connector with wires.

Detail of the 6.3mm crimp.

Positions for K7 relay (blue) and FE9 fuse (green).
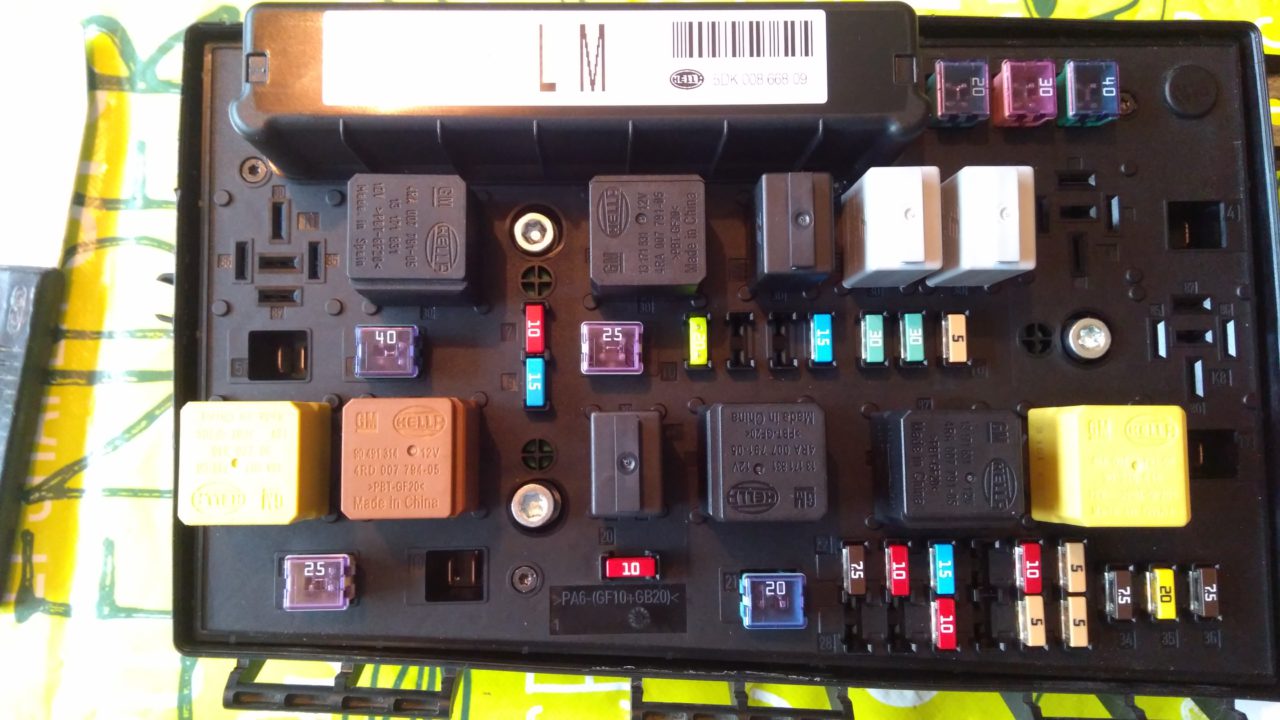
Relay and fuse fitted into UEC.
Fitting the washers onto the bumper
Now comes the fun part. If you do not get a new bumper with the holes pre-drilled, you will have to cut them into your existing bumper. Luckily, it’s not that difficult if you have a steady hand and sharp tools, as the plastic is quite soft and on the back of the bumper the positions for the holes are clearly marked. You start with a smaller cutout by drilling many small holes and then you finish the opening with a sharp cutting knife and a fine sandpaper. You should cut only in small increments and check the result by fitting the cover in place to make sure you get a nice and clean result.


Once you have the holes cut and cleaned, paint the edges and the covers with the color (I suggest you use the aerosol spray paint with the exact color code from Opel if you do not have the option to get it painted by a spray shop). I used PAINT,AEROSOL SPRAY,POWER RED (PAINT CODE 50B) (2 COAT) part number 93165283 (GM number 17 65 060) which costs about 15€.


And finally you attach the retainers to the back of the bumper by the adhesive tape. To make sure you get them straight, first attach the covers to the retainers (there are two latches on the cover that will hold the cover in place) and only then remove the protective film from the tape and stick the retainers to the bumper, aligning them with the aid of the covers fitting inside the holes.


Then you can fit the motors to the retainers and attach the nozzles (you will have to pull out the extruding part of the motor by force). Onto the nozzles you attach the covers, from which you should remove the two latches with a cutting knife (they are only needed in case when the bumper is pre-fitted with washer covers to hold the cover in place in the retainer). Otherwise the latches will interfere with sliding the covers back in place after a headlamp wash (in my pictures they are still in place, since I was not sure, if they are still needed, but I cut them off later).


Replacing the reservoir
As a last part you need to replace the washing liquid reservoir. Once you remove the old one and disconnect the connectors from windscreen pump and optional level sensor, you can remove the pump and sensor from the reservoir and fit them onto the new reservoir (you will have to cut the hole for the sensor with a 19mm drill). From the other side of the reservoir you fit the headlamp wash pump and attach the hose. Reuse the cap from the old reservoir and reassemble everything back together.


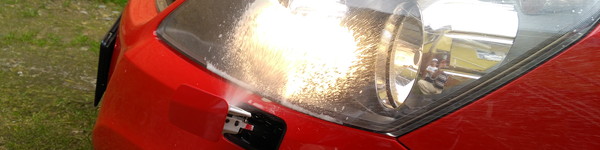
Verifying the functionality
And here is the final result. Remember, for the headlamp washers to engage, you need to have the headlights on (switch in position 2 or AUTO if dark outside) and you give a longer pull to the lever to wash the windscreen. Also, there is a pause of about 5 minutes after a successful spray before the washers spray again (to not engage with every windscreen wash to conserve the washing fluid).

The following video shows washers in action (I’ve already retrofitted AFL headlights).