In the previous post I created guides for retrofitting headlamp washers, which are a law requirement for xenon headlamps in many countries. Now I will continue with guides for retrofitting bi-xenon AFL (Adaptive Forward Lighting) headlamps. This will not be some aftermarket HID retrofit, but as a xenon pack option fitted by Opel/Vauxhall from the factory.
Preliminary checks
The first thing you should check whether your UEC supports AFL headlamps. In UEC under variant configuration you should see the following options available AFL Zafira-B (Adaptive Forward Lighting). Also, AFL has it’s own telltale on the instrument cluster. To check, whether your IPC supports it, activate AFL telltale test through TECH2/GM MDI/OPCOM and the pictogram (orange headlamp with side arrows) should light up.
AFL variant configuration in UEC
AFL telltale test in IPC
Wiring diagrams and connector pinouts
The following wiring diagrams will help you identify, what wires in the headlamp wiring loom need to be swapped/replaced/added/removed in order to retrofit AFL headlamps instead of halogen ones. I’ve included diagrams for both halogen and AFL headlamps for comparison. For halogen headlamps, there are eight wires going to each light connected via E119L/E119R connector. For AFL headlamps, there are eight wires going to right light, so the E119R ZFW 10-4 connector is compatible. Only one wire responsible for headlamp leveling needs replacing. For left AFL, there are 13 wires going to E119L connector, so ZFW 10-4 housing needs to be replaced with ZFW 16-1 bearing 16 pin positions. The extra five wires are for CAN-BUS and leveling sensor. The leveling sensor attached to the rear axle feeds data to left AFL and is interconnected via X3 connector (the interconnection can be omitted and the wires can run from the leveling sensor straight into E119L connector, the choice is yours).
Halogen headlamps wiring diagram
Right AFL headlamp wiring diagram
Left AFL headlamp wiring diagram
E119R connector for right headlamp
E119L connector for left headlamp and X3 connector
UEC (X125) XE1 connector pinout
X3 male connector
X3 female connector
UEC fuses layout
E119R (ZFW 10-4) connector pinout for right AFL headlamp
E119L (ZFW 16-1) connector pinout for left AFL headlamp
Position of leveling sensor B25 under the vehicle
B25 (ZFW 6-10) connector pinout for leveling sensor
I’ve created easy-to-follow wiring matrix, depicting which wires can be reused, what wires need adding and which wires are no longer needed in the headlamp wiring harness. Ignition voltage wire for right AFL (XE1/41=>E119R/6) can be reused, but I’ve decided to replace it with 1.0mm2 wire as documented in schematics, as the old wire is only 0.5mm2 thick. For the left AFL, you need to run a new Ignition voltage wire from XE1 connector and add a 10A fuse to position FE31 in UEC (for halogens, both left and right lights are fused via FE23 10A fuse, while for AFL, only right AFL is fused via FE23 and left AFL is fused via FE31).
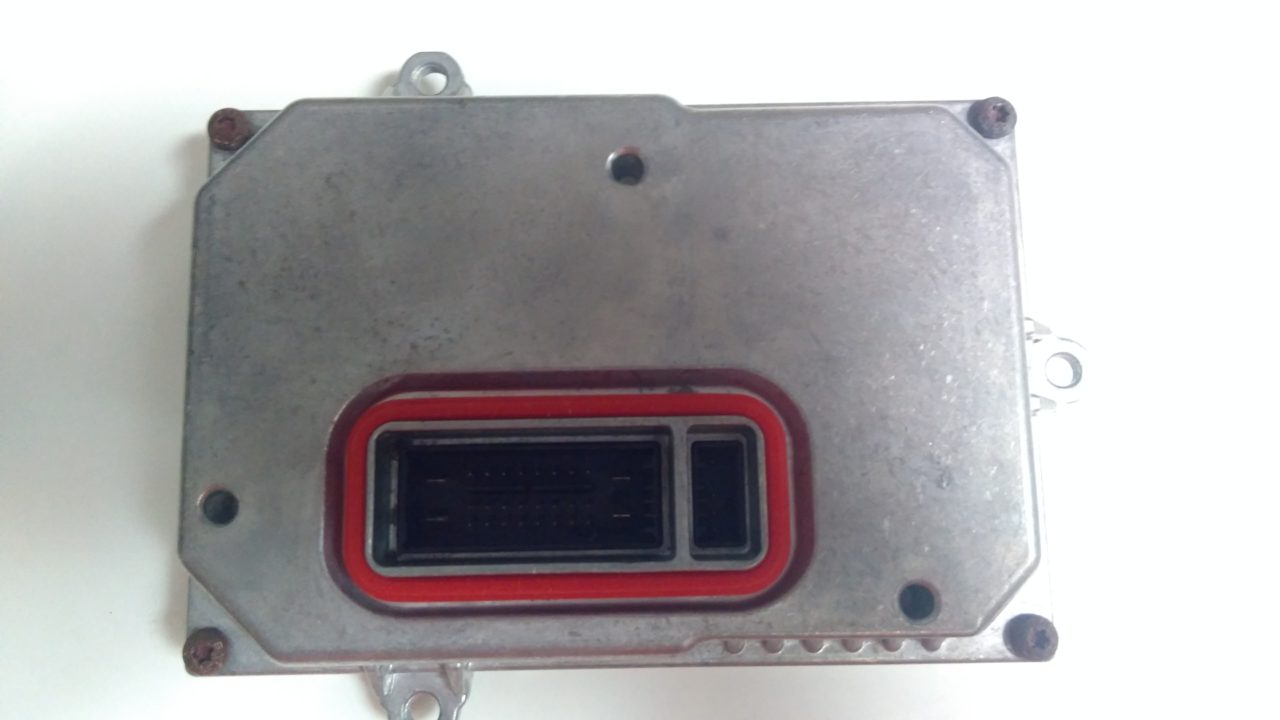
To retrofit AFL headlights, you will need the actual xenon headlights [9] with control modules [1]. As opposed to Astra H, which has two control modules per AFL headlight (only one module for AHL headlight version without cornering), there is only a single control unit per AFL headlight, which provides ignition to xenon bulb [3] and does the cornering and leveling. The leveling is automatic according to trunk load, which is measured by a leveling sensor [4] on rear axle. The sensor is attached by screws [7] and nuts [8] to the body and is connected to rear axle with a bracket [5] or [6], depending on axle type (more on that further below).
Parts list for AFL retrofit.
You will also need to replace the light switch with one that does not have manual leveling of headlights control (bottom right knob). There are only two variants for xenon headlights, one without AUTO position (positions 0-1-2) and one with AUTO position (AUTO-0-1-2) in which headlights’ on/off state is controlled by light sensor on the front windshield. Both variants have front fog lamp button, as fog lamps were part of AFL headlights option. So if you do not have fog lamps fitted and want to retrofit AFL headlights, you either retrofit fog lamps first, otherwise you will end up with a light switch with obsolete buttons (either front fog lamp button if replacing the light switch or leveling control knob if keeping your current switch).
If you have Opel (LHD), search for headlamps ident NL/CH and light switch ident LE/FL. If you have Vauxhall (RHD), search for headlamps ident CG and light switch ident RD/RE. It is not possible to use CG lights on LHD vehicle and NL/CH lights on RHD vehicle as you would be blinding oncoming vehicles due to opposite light beam formation so pay close attention to what you are actually buying (the ident is printed on the bottom of the headlight along with date of manufacture).
The following table lists all the parts with corresponding part numbers, count and retail price from Opel/Vauxhall (you can usually get 10-30% discount from your local dealer). Used parts are usually much cheaper. Your choice.
Note: if you are buying new or undamaged headlamps, the repair kit [2X] is obsolete. You need it only in case you are buying second hand headlamps that have one or more of the holding brackets damaged or broken. In the kit there are all six brackets, three for each headlight, but only four smaller screws for upper and center brackets (bigger screws for bottom brackets are two). Therefore if you need to fix all four upper and center brackets with one kit, you will need to get two more screws from hardware shop (the upper brackets take two screws, the center ones take one screw). Images below are for illustration what damage can and what cannot be repaired with the kit.
Identifying the correct bracket for leveling sensor
The information in EPC is sometimes misleading on identifying what bracket you need, as the usage is identified by an engine type. For my A16XER [LDE] engine, EPC was showing bracket 13209189 as the one suitable, even though I do not have sport chassis package.
So I digged deep inside GlobalTIS and found an article about the rear axle listed among new features in Zafira B. From the article I deducted that the difference is in welding angle of torsion beam between normal and sport chassis and since the bracket gets attached to the torsion beam, there are two variants to compensate for the different angle.
Three rear axle variants are available. The basic chassis which has been tuned primarily for a high degree of ride comfort. The welding angle (I) of the torsion beam (2) is 45°; as a result, the wheels are able to comfortably drive over even quite rough surface irregularities.
The second variant is the optional “Chassis Package Sport” for higher-spec engines. The welding angle (I) of the torsion beam (2) is 25° . This welding angle gives the rear axle a degree of torsional stiffness. As a result, vehicle handling is on the whole much sportier, for example because of the higher cornering stability.
The third variant is currently only available for the Zafira-B with Z 20 LER petrol engine. This model is fitted as standard with the “Chassis Package Sport”. Here too, the welding angle of the torsion beam (2) is 25°. It differs from the second variant in that it has larger rear brakes. The following illustration shows the different variants and also describes them in detail.
[1] Damping bushing mount [2] Torsion beam [3] Mounting points for brake carrier [4] Mounting point for shock absorber [I] Welding angle of torsion beam
Welding angle of torsion beam
1) Basic chassis, welding angle 45°, size of brakes: 264 mm x 10 mm
2) “Chassis Package Sport”, optional for higher-spec engines, welding angle (I) of torsion beam (2) 25°. Size of brakes: 264 mm x 10 mm
3) Zafira-B with Z 20 LER petrol engine fitted as standard with “Chassis Package Sport”, welding angle (I) of torsion beam (2) 25 °, size of brakes: 278 mm x 10 mm
Therefore, if you are unsure, what chassis you have in your Zafira, you can always check and measure the welding angle if the torsion beam. If it’s 45°, get bracket 13220082 and if it’s 25°, get bracket 13209189.
Below are the actual photos of the parts I bought for my retrofit (LHD Zafira). Most of the parts I bought are used except the screws-nuts and xenon bulbs. I advise you not to buy used bulbs, as the replacement procedure is a real PITA and you want to carry it out as seldom as possible. Of course you don’t need to buy the bulbs from Opel/Vauxhall, but any shop that carries D1S bulbs. Make sure you buy a genuine reputable mark (e.g. Osram or Philips have holograms and codes on the bulbs AND packaging to make sure you are buying genuine product), not some Chinese fake bulbs that will last few months).
Control unit 13153357
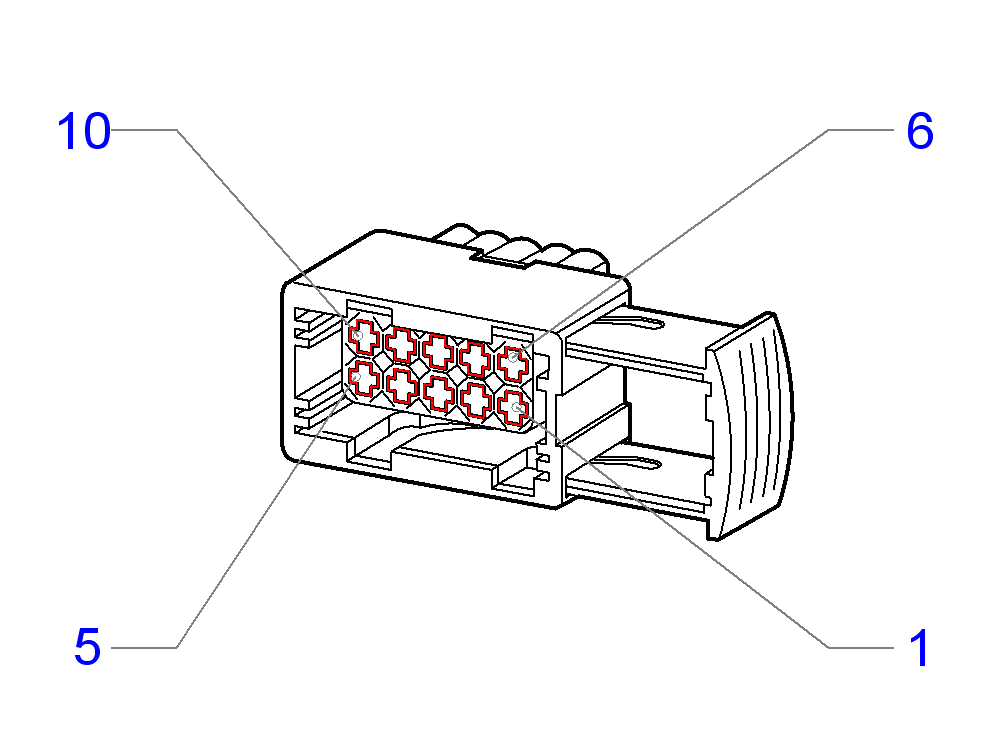
Connector of the control unit
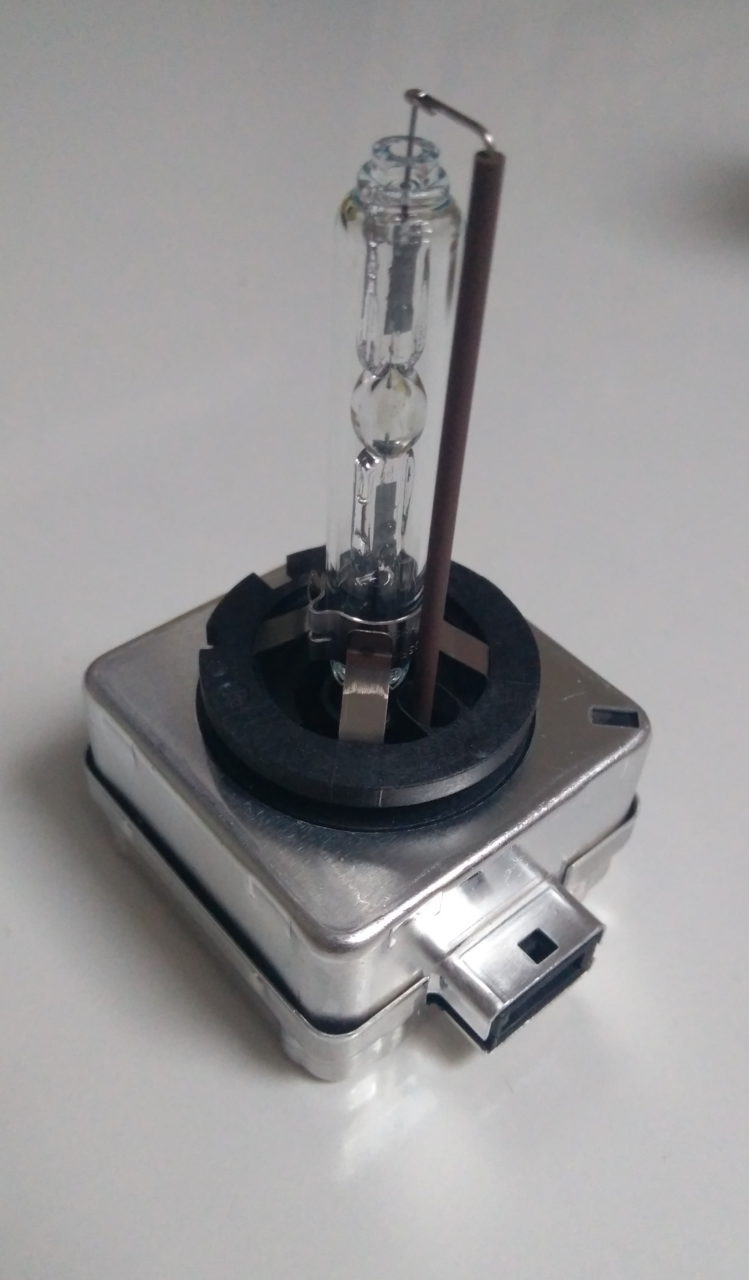
D1S bulb 93188009
D1S Osram Xenarc bulb
Sensor assembly 13153356
Leveling sensor (not sold separately)
Bracket 13220082 (standard chassis)
Detail of bracket 13220082
Screw 11094861, nut 90575881
Left AFL headlamp 93190406
Left headlamp has 16-pin connector
Right AFL headlamp 93190407
Right headlamp has 10-pin connector
Light switch 93185588 (with AUTO feature)
Light switch ident LE
Connectors, crimps, wires and accessories
Besides the new parts, you will also need to source some new connectors with crimps, wires, and tools.
The left AFL headlamp uses 16-pin ZFW 16-1 connector, so you will need to replace the existing ZFW 10-4 connector. You can order a repair loom from Opel/Vauxhall (part n. 13422492 GM n. 12 87 302 CONNECTOR, HEADLAMP) for 98,52€. Better option is to buy the connector directly from TE or a retailer. TE part number is 1-967242-1 and requires AMP JPT SWS (Single Wire Seal) 2.8mm crimps. For 0.5mm2 and 1.0mm2 wires order 7 pcs. 2-929939-1 contacts. Next, 6pcs. seals for 0.5mm2 wire 828904-1, one seal for 1.0mm2 wire 828905-1 and 3pcs. blanking plug 828922-1 for the unused positions in the connector. The third option is to buy the whole wiring loom from a scrap yard. The connector with wires running to XE1 and X3 connector is part of headlamp wiring harness.
The right AFL headlamp uses the same connector as halogen headlamp, you will just need to swap/replace two wires. Therefore you will need 2pcs. 2-929939-1 contacts (for both 0.5mm2 and 1.0mm2 wires), one wire seal for 0.5mm2 wire 828904-1, and one seal for 1.0mm2 wire 828905-1.
To connect the leveling sensor, you will need ZFW 6-10 connector – you can buy one as a repair loom from Opel/Vauxhall (part n. 93181787 GM n. 62 86 590 CONNECTOR, LEVELING SENSOR) for 84,24€. Again, you can buy from TE or retailer, part number is 1563872-1 and requires MQS SWS crimps. For 0.5mm2 wires order 3 pcs. 5-965906-1 crimp, 3pcs. wire seal 1-967067-1, and 3 pcs. blanking plug 967056-1 for the unused positions in the connector. The third option is to buy the whole wiring loom from a scrap yard. The connector with wires running to X3 connector is part of main body wiring harness.
For X3 connector to add new wires, use AMP JPT 1.6mm series contacts, 3pcs. 964274-2 female and 3pcs. 964269-2 male contacts. For both male and female use 6pcs. wire seals 964971-1.
To add wires to XE1 connector, use 2pcs. AMP JPT 2.8mm contacts for 1.0mm2 wires 2-929939-1 and 2pcs. corresponding wire seals 828905-1 for positions XE1/27 and XE1/41. For positions XE1/36 and XE1/38 use 2pcs. AMP JPT 1.6mm contacts 964274-2 and 2pcs. wire seals 964971-1.
You will run three 0.5mm2 wires from the sensor to the headlamp color-coded as green-white, white-red, and brown-blue in total length of about 765cm. first part is 625cm long from the leveling sensor B25 to X3 connector and second part 140cm long from X3 connector to the left headlamp E119L. From right headlamp E119R you will run 300cm 1.0mm2 black wire to XE1 and 310cm 0.5mm2 brown-yellow wire to left headlamp E119L. From left headlamp E119L you will run one 125cm 1.0mm2 black wire to XE1 and two 125cm 0.5mm2 wires – twisted green and white – to XE1. If you cannot source the wires in suggested colors, use any other colors but try to adhere to the required wire diameters.
For tools, get good crimping pliers – I suggest Engineer PA-20 or PA-9 pliers. They are well worth the extra cost compared to some cheap Chinese crimping pliers and they make crimping a joy. Also, get some electrical and automotive tapes and plastic wiring tubes to protect the wires from damage.
ZFW 16-1 connector with crimps and seals
ZFW 6-10 connector with crimps and seals
Wires for leveling sensor
Detail of X3 pins
Detail of ZFW 6-10 pins
Engineer PA-20 in action
A good crimping tool is a recipe for success
Various tubes and joins for wiring
Various electrical and automotive tapes
Crimp removal tools
Preparing the wiring loom for headlamps
If you want to prepare the wiring beforehand (e.g. you will need to drive to the workshop performing the AFL programming with the old halogen headlamps), it’s possible to run the wires between UEC/X3 and headlamp connectors without hindering halogen headlights.
Right AFL headlamp (E119R) requires only swapping two wires in the current wiring loom. First is black wire running from E119R/6 to UEC XE1/41, which core is 0.5mm2 thick and needs to be replaced with 1mm2 thickness (could be left in place, I guess, but I wanted to do it right). Remove the crimp from XE1/41 and E119R/6 with a tool and you can leave the old wire in the loom and run a new 1mm2 black wire (300cm long) from UEC along the front brace to E119R into the same positions. The second black-white wire in position E119R/8, which controls headlamp leveling (through knob on the light switch), and goes to XE1/57, will have to stay in place till you replace the headlamps, but you can prepare a new brown-yellow 0.5mm2 wire (310cm long) in-between E119R and E119L connector. Seal it on E119R side to protect it till the time you will do the swap of headlamps. It will control leveling of right AFL headlight from left AFL headlight, which will have the leveling sensor connected.
Left AFL headlamp (E119L) requires a new 16-pin connector (ZFW 16-1) instead of 10-pin for halogen headlamp (ZFW 10-4), since there are new connections to leveling sensor and HS-CAN needed. You can run the new wires to this connector and leave the current wires in the old ZFW 10-4 connector for now. Once you do the headlamp swap, you will unpin the remaining crimps with wires from ZFW 10-4 and insert them into new ZFW 16-1 to complete the wiring for left AFL headlamp. Run three new wires (each 0.5mm2 thick and 140cm long) from E119L to X3 connector – green-white wire (leveling sensor high signal) from E119L/12 to X3/26, white-red wire (leveling sensor signal) from E119L/13 to X3/27, and brown-blue wire (leveling sensor low signal) from E119L/5 to X3/28 position. Next, run three new wires (each 125cm long) from E119L to XE1 connector – black wire (ignition voltage) 1.0mm2 thick from E119L/9 to XE1/27, green wire (HS-CAN high) from E119L/14 to XE1/36, and white wire (HS-CAN low) from E119L/6 to XE1/38 position. Both green and white wires need to be 0.5mm2 thick and twisted together to prevent interference from the surroundings (about one twist per cm). The brown-yellow wire you prepared, when doing preparation for right AFL headlamp, put into E119L/15 position. You should have 7 wires connected to E119L ZFW 16-1 connector in total. You will add another 6 wires when doing the swap from ZFW 10-4 connector (more on that later).
Positions for new wires
New wires for right headlamp
New wires for left headlamp
Crimping a new crimp with seal
All wires ready for left AFL
New 16-pin connector for left AFL
X3 connector with new wires
Three new wires will go through X3 to the leveling sensor in the back
Detail of XE1 with new pins added
Running the wiring loom for the leveling sensor
Leveling sensor is connected to left headlamp via X3 connector in engine compartment. The wires run from the connector along the main body wiring loom harness through rubber grommet under the steering wheel. To get the three wires through the grommet I used a trick – sharpened hard straw with which I created a hole in the rubber and fed the wires through the straw. Then I pulled out the straw and bandaged the wires in a self-sealing rubber tape to make the hole waterproof.
The rubber grommet with main body wiring harness under the dashboard.
Grommet on the left, clutch pedal switch on the right.
The green straw pushed through the grommet above the existing wires.
Straw is in position to feed the wires through.
Three wires for the sensor coming through (with crimps in place already).
All the cables will need to be pulled through the new hole into the car under the dashboard.
Wires already inside the car. Textile car tape applied.
Self-sealing rubber tape applied to the wires and then slightly pulled into the hole to make it watertight.
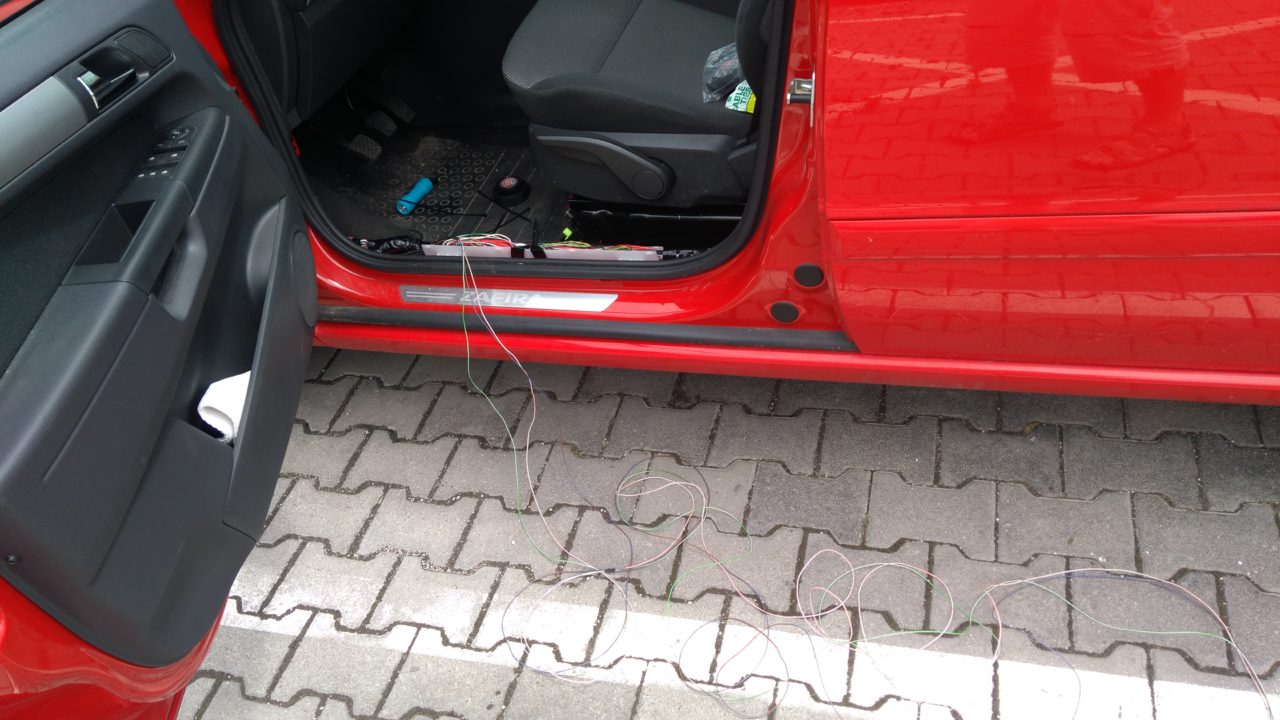
Once this hardest part was done, I continued running the wires through driver door sill, rear left door sill, above the rear left wheel arch and under REC. From under REC I continued along the back tool compartment in the floor and under the left 3rd row seat (after lifting the floor carpet). There is another rubber grommet under the 2nd row seats sealed with some white chewing-gum-like compound, through which you can use the same trick as in the front and feed the wires through the grommet.
Running the wires inside driver door sill.
And along rear door sill.
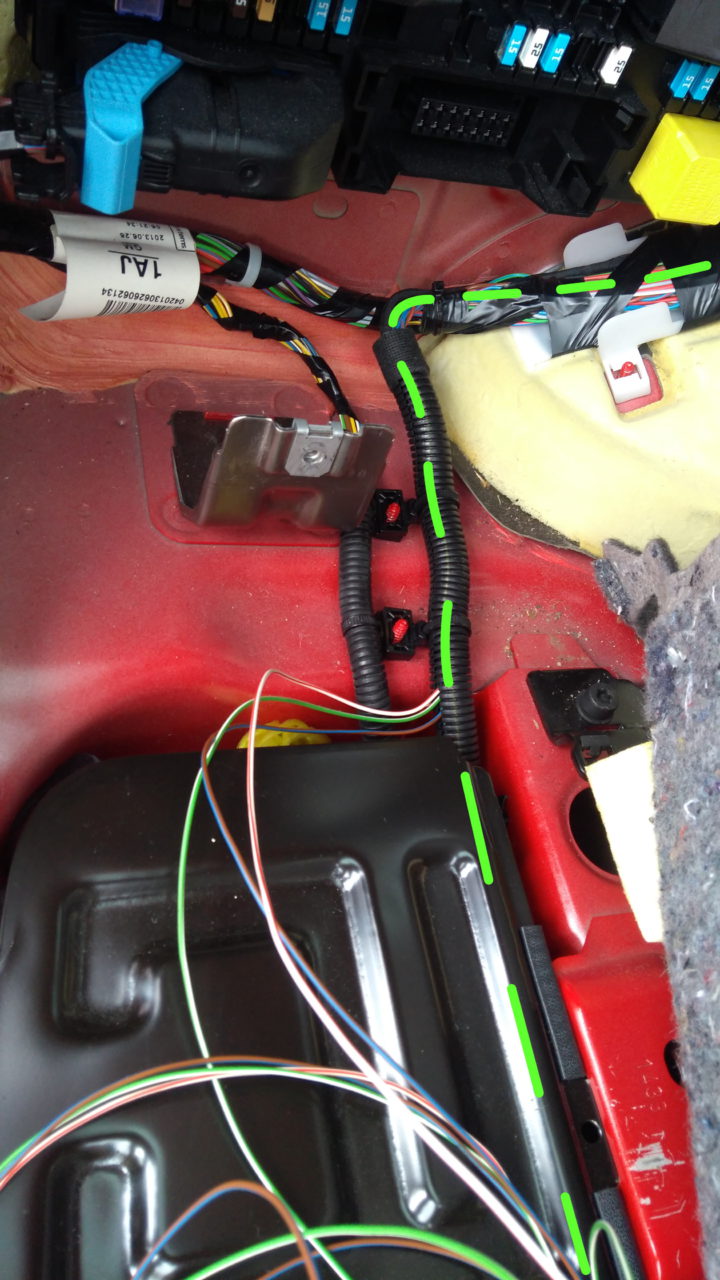
Over wheel arch (along the green dashed line).
Making a turn under REC and continuing along the back compartment in the floor.
Under the carpet under 3rd row left seat.
Reaching the grommet in the floor.
Detail of the grommet from inside.
Running the wires through the grommet.
Wires are through and white compound pressed back in to make the grommet watertight.
Grommet back in place.
Once you are outside under the car, you can put on the ZFW 6-10 connector. Into position 1 goes brown-blue wire (leveling sensor low signal), position 4 white-red wire (leveling sensor signal) and position 5 green-white wire (leveling sensor high signal). Tuck the wires inside the existing plastic guard tube and at the first junction, separate the three wires and use a new piece of tube to guard the wires up to the leveling sensor connector.
The arrow pointing to the rubber grommet above the rear axle through which to feed the wires.
The wires will go into the existing guard tube.
The wires turned out to be a little longer than needed (as I used a little shortcut in the engine compartment) so I just folded and taped them together.
Detail of attached ZFW 6-10 connector.
Attaching the leveling sensor
To attach the leveling sensor (13153356), insert two screw nuts (90575881) into the holder slots under the vehicle right above the rear axle torsion bar (check the pictures bellow, as indicated by blue arrows). Use two screws (11094861) to secure the sensor in place. Attach the bracket (13220082 or 13209189) to the torsion bar perpendicular to the lever on the sensor and snap in the lever to the ball joint on the bracket. Plug in the ZFW 6-10 connector into the sensor.
Use a hammer to force the bolt nuts in.
You can attach the wiring loom to the top hole, but when fitted from the factory, the loom is attached by a strip tie to the bottom anchor hole.
I retraced the wire loom and fitted it the bottom anchor hole.
Replacing halogen headlamps with AFL xenons
Once you have all the wiring in place and leveling sensor installed, you can start swapping the headlights. Once the front grill and front bumper are removed, unscrew three screws from each headlight, disconnect ZFW 10-4 connectors, and remove the halogen headlights. Use crimp removal tools to swap a wire in right ZFW 10-4 connector E119R – from position 8 remove black-white wire and replace it with newly prepared brown-yellow wire. Next, remove six wires from left ZFW 10-4 connector E119L and insert them into the new ZFW 16-1 connector into the appropriate positions – yellow wire from position 3 to position 1, brown 1-2, black-white 5-3, grey-black 4-4, brown 7-10 and white 2-11. Install xenon control units on the bottom side of the AFL headlights and secure them with three screws. The screws have special double-thread and are not orderable separately (not listed in Zafira section, but it might be possible, that they are used elsewhere and listed in EPC – if you know the part number, please let me know). If you did not buy the headlamps complete with control units, you will have to substitute the screws with some other alternative. I only had three original screws, so I ordered screws for xenon control units in Astra H (part no. 93171843, GM no. 12 19 028), but as you can see from the pictures, they are not the same. However, they will sufficiently hold the Zafira B control units in place.
Once you have the headlamps assembled, mount them onto the car, connect wiring and start the programming. You need to program High-Speed CAN configuration and set entry AHL/AFL (Headlamp Leveling) from Not Present to Present in every unit connected to HS-CAN. Next, enter Zafira B => Body => AHL/AFL (Headlamp Leveling) unit and program variant configuration according to the features present in your car. With the car standing on a flat surface, do the leveling sensor calibration to set the reference value (in Volts) for the sensor. If everything is programmed correctly and calibrated, the headlamps should do a short sweep in-out upon startup and stay on. If you apply load to the rear axis, the light beam should by adjusted lowered according to the load (takes about 8-10s to start adjusting).
Last thing you need to swap is the light switch. Remove the old switch by setting the wheel to most left position (0 or AUTO depending on your model), pressing it down and while pressed, turn it right one position. The wheel should stay pressed in and you can pull out the switch. Disconnect the connector from the back by releasing the lever and remove the switch. On the new switch do the same – rotate to the left, press, rotate to the right (this will retract the latches that hold the switch in place). Connect the connector, insert the switch, and secure in place by rotating the wheel to the left. If you need visual guide for the procedure, lookup Astra H remove light switch on YouTube.
IPC ignition telltale test showing AFL pictogram
Final result
Now, after all the hard work, you can enjoy driving through the night with upgraded headlights. Here are a few more images and videos showing the retrofit in a full glory. I hope you enjoyed working on the project as I did.
Video showing AFL headlamps swivel check upon engine startup and transition between low beam and high beam.
Short video showing how the headlamps swivel to better light the corners during a drive.
19 Replies to “Opel/Vauxhall Zafira B AFL Bi-Xenon retrofit”
Hello,
This is the most detailed retrofit that i read ever!! After read it get confident enough to think that i will be able to do this myself. I bought used AFL headlights but i have few questions which i think will be easily answered by a person with your knowledge.
Will you be kindly enough to let me know your email so we can discuss about Zafira b retrofitings
Best regards
Marian
Bulgaria
Hi . this is the best of the fuckin’ best retrofit instructions i have ever seen.
Many thanks to uploader. 10+
If you have access also to other electrical drawing please leave your email so i can contact you. or just send me a email to erosloveme88@gmail.com
Thanks.
Top quality topic!
Bonjour merci mironto.
J ai reçu le connecteur mes je ces pas comment faire le brochage !! Moi j’ ai coupé les fils et je ces pas comment faire le brochage en chassant que moi je vais juste faire fonctionner les phares xénon
Hello. I have changed one headlight ( Afl) for my Astra H Gtc with one without Afl – normal xenon. It is possible to getting to work the auto leveling function? Thank you. Best regards
I have Zafira and there’s only AFL or halogen option. But AFAIK both AFL and xenon on Astra uses control unit (located somewhere at driver’s A pillar) that does the autoleveling. But probably if there’s error code for non-AFL xenon (not able to swivel) the whole system deactivates. Just my guess.
Great write up. If say you was not worried about the self leveling and just want the headlights to work, what wires will need to be swapped in both connectors.
And would need the new plug for the lhs light.


Hello,
This is the most detailed retrofit that i read ever!! After read it get confident enough to think that i will be able to do this myself. I bought used AFL headlights but i have few questions which i think will be easily answered by a person with your knowledge.
Will you be kindly enough to let me know your email so we can discuss about Zafira b retrofitings
Best regards
Marian
Bulgaria
Hi . this is the best of the fuckin’ best retrofit instructions i have ever seen.
Many thanks to uploader. 10+
If you have access also to other electrical drawing please leave your email so i can contact you. or just send me a email to erosloveme88@gmail.com
Thanks.
Top quality topic!
Bonjour j arrive pas a commandé les connecteurs zfw 16-1 ?
https://www.mouser.fr/ProductDetail/TE-Connectivity-AMP/1-967242-1?qs=%2Fha2pyFaduieFlTebQ%252BQEkX8SU6%252BUn9dbgrZGZ9rIO0=
Bonjour merci mironto.
J ai reçu le connecteur mes je ces pas comment faire le brochage !! Moi j’ ai coupé les fils et je ces pas comment faire le brochage en chassant que moi je vais juste faire fonctionner les phares xénon
Sorry, I don’t uderstand French and Google translation does not make sense.
I received the connector how do I pin the girls? I cut the old connectors my i these not the positions of the wires.
Hi Jack. You need to start reading the guide, it’s all there.
Buy seven crimps 929939-6 (it’s the same/better as 929939-1 but available from Mouser to buy in single quantity):
https://www.mouser.fr/ProductDetail/TE-Connectivity/929939-6-Loose-Piece?qs=sGAEpiMZZMs7eK6h2EBtKr3mSs4ElHdBo8kuSnefH%2FM%3D
Six seals for 0.5mm2 wires:
https://www.mouser.fr/ProductDetail/TE-Connectivity/828904-1?qs=%2Fha2pyFaduit82dVaZ9ehO5QERYgnNgS5Y%252BKeljHxeo%3D
One seal for 1.0mm2 wire:
https://www.mouser.fr/ProductDetail/TE-Connectivity-AMP/828905-1?qs=%2Fha2pyFadug3VIvxttcCELq9M0kATVD5SwtqDqmdd3g%3D
And three plugs for unused positions:
https://www.mouser.fr/ProductDetail/TE-Connectivity/828922-1?qs=%2Fha2pyFaduhTenie3UW3zh6078OqVWuQ%252BY1B6CWJzD8%3D
Is there significant chnage to retrofit AFL in Astra H?
Hello Marc, please check this guide from Pecky on how to retrofit AFL to Astra H.
https://tech2.guru/astra-h-retrofit-afl-headlights/
Thank you sir for your guidance.
You did an excellent job.
Hi Sir,
Where can buy this clips?
https://ibb.co/Zm85zkL
Sorry, I cannot remember where I bought that clip.
Hello. tell me you managed to coding the AFL option with opcom
Hi. No, the coding was done with GM MDI 2.
Hello. I have changed one headlight ( Afl) for my Astra H Gtc with one without Afl – normal xenon. It is possible to getting to work the auto leveling function? Thank you. Best regards
I have Zafira and there’s only AFL or halogen option. But AFAIK both AFL and xenon on Astra uses control unit (located somewhere at driver’s A pillar) that does the autoleveling. But probably if there’s error code for non-AFL xenon (not able to swivel) the whole system deactivates. Just my guess.
Great write up. If say you was not worried about the self leveling and just want the headlights to work, what wires will need to be swapped in both connectors.
And would need the new plug for the lhs light.
AFLs will not work without leveling sensor. The wiring diagrams and spreadsheet are self explanatory.